Webinars using Class Collaborate
/prod01/channel_3/media/tcd/blackboard-ultra/images/integrations/class-collaborate-hero.png)
Class Collaborate is a virtual classroom program that lets you host webinars with your students and communicate with them via voice, video, lecture slides and text chat. Collaborate is available on any module in Blackboard Ultra and supports up to 250 participants by default, and up to 500 in large session mode.
Additional Information
Benefits of Webinars for Teaching & Learning
You can use webinars to:
|
• Host live virtual classrooms with students |
|
• Communicate using webcams, microphones and text chat |
|
• Share lecture notes and stream video of your desktop |
|
• Collaborate with students using an interactive whiteboard |
|
• Record webinars for students to rewatch at any time |
|
• Provide virtual office hours that students can join from any location |
Accessibility
Automatic Live & Recorded Captions:
Staff and students can use the live captions option in Google Chrome to view machine-generated captions both during live sessions and when viewing session recordings. Machine-generated captions provide approximately an 85-95% accuracy rate, which may vary based on the audio sound quality of your recording and the topics being presented. Some medical or scientific terms may not transcribe as well as general English language commentary. In instances where you are giving important instructions or guidance (especially when the student's safety is concerned), please check the captions to ensure accuracy, so that no transcribed words are misinterpreted or misguiding for students.
Manual Live & Recorded Captions:
For live sessions, you can invite a guest user and allow them to caption a live session for any students who need this. Information on closed captioning features is available on the Class webpage. A video demo of the captioning feature is available on the Blackboard YouTube channel. For recorded sessions, you can upload a captions file containing a transcript of the session - details are available on the Captions page of the Collaborate website under the 'Upload your own caption file' section.
Uploading Recordings to Panopto
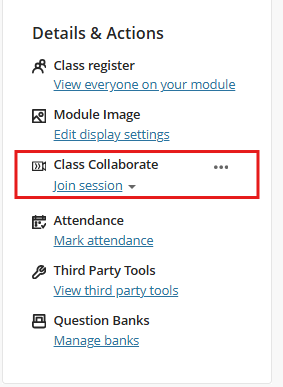
Sign in to Blackboard, go to the specific Blackboard Ultra module, and Class Collaborate is located in the Details and Actions area of the module.
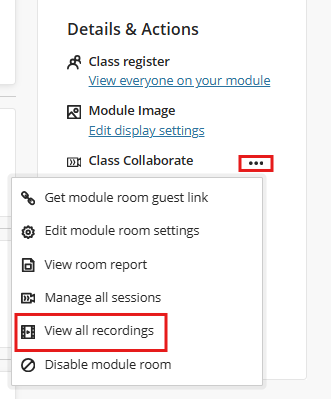
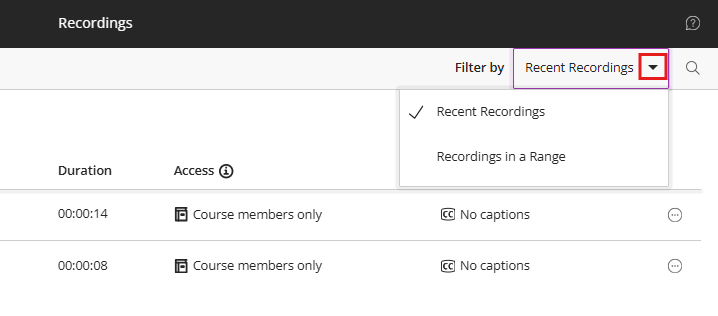
Click the three dots, then select View all Recordings from the drop-down menu to display the collaborative recordings for your module. If you don’t see any recordings, change the Filter by: field to recordings in a range rather than recent recordings. Collaborate only shows the last 30 days of recordings; anything further back requires a date-range search to display.
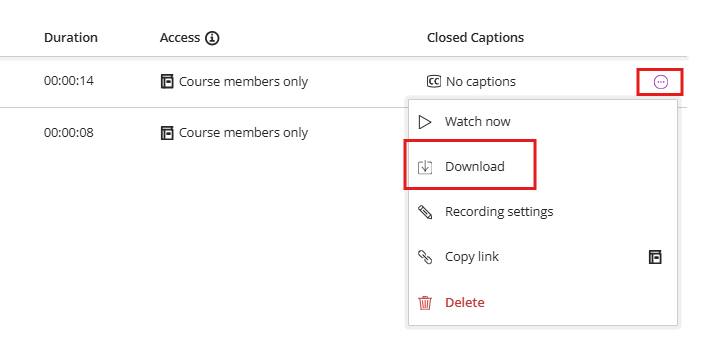
Click the symbol with three horizontal dots and a circle around them labelled Recording Options, then click Download from the pop-down list. This will trigger the download of this recording as an .mp4 file to your downloads folder on a Windows PC and to the Downloads folder on your Macintosh computer.
Now go to the module where you already have Panopto Recordings set up in the module content area, and click the Lecture Recordings link.
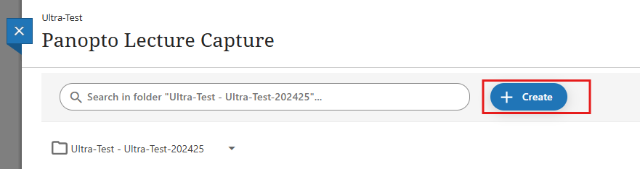
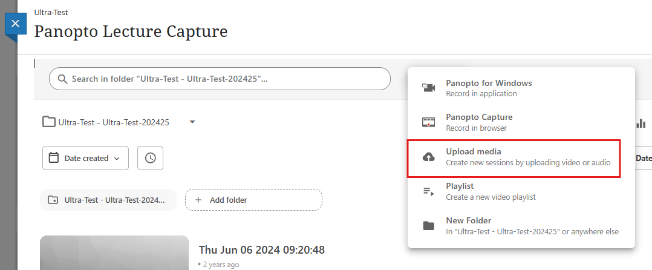
Click the Create button, then choose the Upload Media option.
Drag the collaborate recording .mp4 file from your downloads folder into this drop area, and the recording will begin uploading to your Blackboard module's Panopto folder.
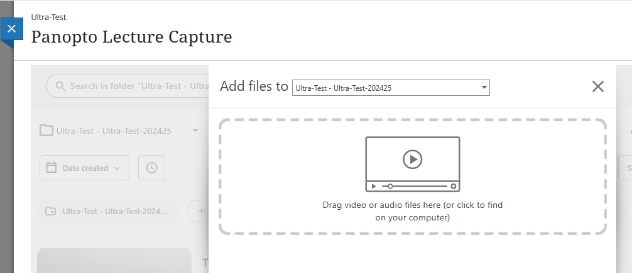
Once the upload has completed, you will be able to play back or edit your Class Collaborate recording (.mp4) within Blackboard Panopto as required.
Frequently Asked Questions
Can students download recordings?
Students can't download Class Collaborate or Panopto recordings by default, but you can change a recording's settings to allow downloads.
How can I show animated slides to my students?
If you upload a file into Class Collaborate, any animations won't carry over, but you can use on-screen annotation features, like drawing and circling items, to draw attention to key points. The advantage is that it works well across different connection speeds for both the presenter and participants.
But if you do need to use the Share Screen option, because, for example, the PowerPoint file has animations or embedded videos that won't convert into Collaborate, an alternative is you share your screen with PowerPoint running the presentation in a window. This lets you position the chat window alongside the shared PowerPoint window so you can view both simultaneously.
How can students use the chat in a large session (+250 participants)?
You can use the chat in a large session; it is set to Off by default, but it can be enabled as participants join. Enable the Large Session mode from the scheduler, then once you have joined the actual session, you can turn on the chat via the Session Settings screen (the gear icon to the right of where you access the chat & share files within Collaborate)
Here are the steps if your colleagues need them to enable a large session for over 250 students and then enable the chat once the students start to join:
Any day before the scheduled session is due to start:
- Go into the module & click on the link to Class Collaborate under Details & Actions
- Find the scheduled session from the list and click on the three dots to the right, then Edit Settings
- Click on the gear icon at the top right and scroll down to Large-scale session (250+)
- Ensure 'Allow 250+ attendees to join' is ticked and click Save - this will automatically disable participants' permissions, such as Chat; this is normal.
- No further changes are needed from the scheduler in terms of a large session - do not try to re-enable permissions from this screen, leave Large Session ticked.
Once the scheduled session starts
- Once the actual session starts, join the Class Collaborate session as normal. From within a Collaborate session, click on the Collaborate panel at the bottom right (the same panel where you would access the chat, share content etc.)
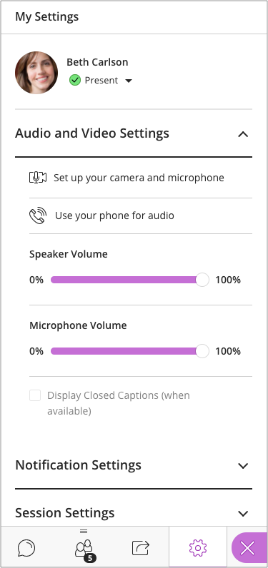
- Click the gear icon to the right of the chat at the bottom to open the My Settings Screen. Click on Session Settings at the bottom of this page. From here, you can enable participants' chat permissions
If you want a particular student to use more than the chat, you can promote them to be a presenter - this would allow them to use their microphone, for example: https://www.class.com/support/collaborate/moderator/moderate-sessions/manage-attendees#promote-attendees_OTP-8. You can always make them a participant after they have finished.
More details on Large Sessions are available here: https://www.class.com/support/collaborate/moderator/schedule-sessions/session-settings#large_scale_session
How do I access recordings older than 30 days?
Collaborate only shows the last 30 days of recordings; anything further back requires a date-range search to display.
Click the three dots, then select View all Recordings from the drop-down menu to display the collaborative recordings for your module. If you don’t see any recordings, change the Filter by: field to recordings in a range rather than recent recordings.
Click the symbol with three horizontal dots and a circle around them labelled Recording Options, then click Download from the pop-down list. This will trigger the download of this recording as an .mp4 file to your downloads folder on a Windows PC and to the Downloads folder on your Macintosh computer.
How can I edit a Class Collaborate recording?
Unfortunately, you can't edit in Class Collaborate directly. However, if you migrate the recording to Panopto, you can edit it there.
To download a recording from Class Collaborate:
Click into Class Collaborate in your module under Details and Actions. Click the three dots to access recordings. Then click on the recording to view it.
Click the three dots, then select View all Recordings from the drop-down menu to display the collaborative recordings for your module. If you don’t see any recordings, change the Filter by: field to recordings in a range rather than recent recordings. Collaborate only shows the last 30 days of recordings; anything further back requires a date-range search to display.
Click the symbol with three horizontal dots and a circle around them labelled Recording Options, then click Download from the pop-down list. This will trigger the download of this recording as an .mp4 file to your downloads folder on a Windows PC and to the Downloads folder on your Macintosh computer.
Now go to the module where you already have Panopto Recordings set up in the module content area, and click the Lecture Recordings link.
Click the Create button, then choose the Upload Media option.
Drag the collaborate recording .mp4 file from your downloads folder into this drop area, and the recording will begin uploading to your Blackboard module's Panopto folder.
Once the upload has completed, you will be able to play back or edit your Class Collaborate recording (.mp4) within Blackboard Panopto as required.
Once it's processed, you can edit it and remove the section you need to remove. You can also attach the chat transcript if needed, alongside the video (as the video itself does not contain the chat messages)
If students or staff are experiencing issues accessing Blackboard or specific modules, please contact the Teaching & Learning IT team via the IT Service Desk by one of the following methods.
You can email the service desk at itservicedesk@tcd.ie. Please ensure you fill in the 'Subject' field with Ultra: when emailing.
Service desk opening hours are:
Monday - Friday: 09:00 - 17:00